This manual is for users of the AR.Pro app, exclusively available on the Android platform. If you use a different app or different platform (e.g., iOS), please do not rely on any of this information.
This manual was written by someone very new to the world of AR.Drones as a method of becoming more familiar with their application of choice (that's AR.Pro!). No warranties are expressed or implied. Use this manual at your own risk. If in doubt, refer back to the manual that came with your AR.Drone.
Here are some basic questions and answers. You can skip this section if you are familiar with AR.Drones and the AR.Pro app.
If you are asking this question then you need to spend some time here before you come back. See you in a little while...
According to Shellware, the developer of AR.Pro:
"AR.Pro is an Augmented Reality Professional Controller Front-end for the Parrot AR.Drone quadcopter flying computer. It features Full Motion control, object following and tracking, management of all AR.Drone configuration data, and the ability to use your phone's azimuth axis (compass) to control the Yaw function of the AR.Drone, plus many more features!"
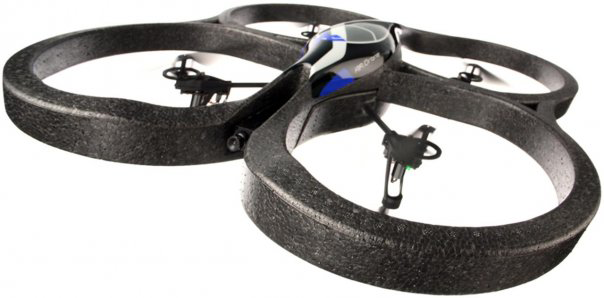
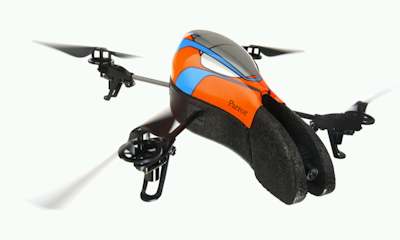
AR.Pro is an app for Android-based devices (e.g., Android mobile phones and tablets) that allows you to control and operate a Parrot AR.Drone. Read all about the app on the developer's website.
Hmm, there isn't one. The app is pretty self-explanatory and these FAQs are here to help fill in any gaps.
Purchase it from the Android Market. Search the market for the AR.Pro or use the following QR tag below to find it:

(use a QR tag scanner such as Google Goggles to automatically send your Android device to the Android market)
No - you have to purchase it from the Android market. See here.
Not any more. There used to be during the early stages of AR.Pro's development, but now you have to purchase the app.
Depends on your device. Your device needs several things:
For more information about connecting your device to an AR.Drone, see here.
These are the basic directions an object can turn through to adjust its orientation. They are frequently referred to in this manual.
Yaw: If you visualise your AR.Drone sat in your microwave oven on its rotating plate... as the plate turns, it is adjusting the yaw of your AR.Drone. Basically turning it left or right and nothing else.
Pitch: If you visualise your AR.Drone sat in the centre of a see-saw, facing one of the seats on the see-saw... then as the see-saw operates, it adjusts the pitch of your AR.Drone. Basically, this is tilting your AR.Drone forwards and backwards.
Roll: Now, imagine your AR.Drone is crawling along a tight rope, with it's nose facing along the wire... as it tilts from side to side over the rope, the roll of your AR.Drone is changing.
According to Netgear.com:
Devices in a wireless network are set up to either communicate indirectly through a central place — an access point — or directly, one to the other. The first is called "Infrastructure Mode" and the other is called "ad hoc" mode (it's also called peer-to-peer).
Your AR.Drone is designed to connect via an ad hoc network to the device it controls. It was not designed to connect to an infrastructure network (although it can be configured to do so). See here for details on how to connect your Android device to your AR.Drone.
Not all Android devices are able to connect to an AR.Drone - but most recent Android devices can be made to connect one way or another. See here for the basic requirements.
The author of AR.Drone Pro has tested it on their rooted Samsung Galaxy S. The author of this manual has tested it on their rooted Samsung Galaxy S2.
There are a couple of different methods you can use to connect to your AR.Drone. Before considering what to do, determine whether your device supports connecting to ad hoc Wi-Fi networks. Here is a simple test:
If your Android device can connect to an ad hoc network, simply instruct your Android device to connect to the ad hoc network of your AR.Drone. Once connected, use the Connect to Drone option in AR.Pro and you should become connected to your AR.Drone in just a few seconds.
If your Android device cannot connect to an ad hoc network:
Short answer: No! It is possible to connect and control an AR.Drone on a non-rooted Android device. Android devices only need to be rooted if your Android device doesn't support ad hoc networks and you want to connect to your AR.Drone using an ad hoc network. You can use an unrooted Android device to control and AR.Drone, even if it doesn't support ad hoc networks, by making your AR.Drone communicate with infrastructure networks instead. See here.
"Rooting" is similar in concept to the term "jail breaking". It describes a process that will result in you having full access to your Andorid device, i.e., it removes layers of protection from the operating system and filing system that allow you to make changes that are not normally possible. Rooting your device will almost certainly invalidate your warranty and potentially involves risk.
Your Android device's Wi-Fi hotspot is a good example of an infrastructure network you may wish to connect your AR.Drone to. You could also connect your AR.Drone to a Wi-Fi router/access point, and then connect your Android device to the same router/access point. This puts your AR.Drone and Android device on the same network. One reason you may wish to use Wi-Fi router could be because the wirless range on your router is much greater than that on your Android device.
The manual approach needs to be repeated every time you remove the battery from your AR.Drone - but, it has the benefit of not invalidating your AR.Drone's warranty.
You are going to need a few tools:
Stage 1: Preparing your Android device:
Stage 2: Fire up your laptop:
Stage 3: Laptop, say hello to AR.Drone:
killall udhcpd ; iwconfig ath0 mode managed essid GALAXY_HOTSPOT ; ifconfig ath0 192.168.43.2 netmask 255.255.255.0 upIMPORTANT: before you press Enter on the keyboard, double check the IP address is correct and hotspot name is correct. In this example, the hotspot was called GALAXY_HOTSPOT. The last part of the IP address should be one number up from the IP address you noted down earler. If you noted 192.168.43.1, then on the telnet command line it should say 192.168.43.2. See how the "1" on the end is now a "2"? Don't miss this step out!
Stage 4: AR.Drone, say hello to your new best friend:
Because the manual approach has to be repeated every time you swap the battery on your AR.Drone, you may find it convenient to automate the fiddly bits to speed the process up.
WARNING: this approach is persistent, i.e., the changes will remain on your AR.Drone even if you turn it off and remove the battery. By changing the software in your AR.Drone in this way, your warranty will not be valid if you were to return your AR.Drone with the changes still in place. You can remove the script however - read on...
BEFORE YOU START: You have to have an initial connection to your AR.Drone. If your AR.Drone doesn't support ad hoc networks (see the test here), you may have to establish the initial connection by running the manual approach at least once. Once connected:
Removing the Infrastucture Mode:
See Shellware's video guide (the basis for these steps) for a clear explanation.
The following section explains the various settings and options held within AR.Pro.
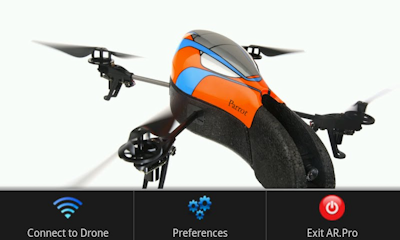
The Main Menu screen is not visible until you press the menu button on your device. Press your menu button and the Main Menu will appear:
 |
 |
Main screen - no menu showing |
The 3 menu options shown above are only visible when you ARE NOT already connected to your AR.Drone and you press the menu button on your Android device. |
 |
|
The 5 menu options shown above ARE ONLY visible when you are connected to your AR.Drone and you press the menu button on your Android device. |
If you have a Detection Type enabled in the preferences, an extra menu option appears: "Object Tracking" |
This menu option will attempt to connect your Android device to your AR.Drone. Once you are connected, you the options will change from those shown in Figure 2 to those shown in Figure 3. A successful connection should also display a live video stream from one of your AR.Drone's cameras.
For more information about how to prepare for connecting to your AR.Drone, see here.
The Preferences menu option takes you into the various preference settings available to customise AR.Drone according to your preferences.
One of the great features of the AR.Pro app is that it is highly customisable. You can access all of the settings via the Preferences button found on the main menu.
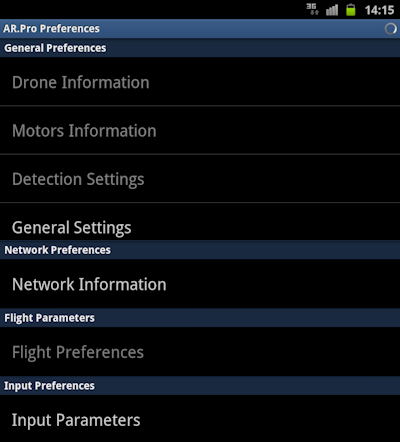 |
Some of the preferences are only accessible if your Android device is connected to your AR.Drone. If you are not connected, some of the options will be greyed out and you cannot select them. The preferences are split into the following areas:
Details of each of these options are described later in this section. WARNING: These settings will directly affect how your AR.Drone behaves once it is in the air. It is strongly recommended that any tweaks made to the settings are tested in a safe environment to ensure you are able to maintain control of your AR.Drone without posing a risk to yourself or others. |
 |
Drone Information is read from your AR.Drone and gives you detailed information about the hardware and software installed within it:
As well as just reporting information about your AR.Drone, this screen also allows you to modify your AR.Drone's name, change the firmware within your AR.Drone and also reboot it. Details of each of these options are described later in this section. |
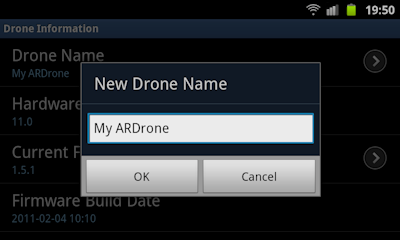 |
The Drone Name option allows you to customise your AR.Drone's name. This is stored and held within your Drone. If you have multiple AR.Drone's this could be useful for uniquely identifying them. It's great as it also allows us to assign cute little pet names, such as "Death Bringer" or "Fluffy Bunny" etc. Moving swiftly on... |
The hardware version number relates to the physical hardware of the AR.Drone itself. This may vary between different generations of AR.Drone.
The "Current Firmware" option firstly displays the version of the firmware currently installed within your AR.Drone. The firmware is the software inside your AR.Drone that controls how it works. Typically, when Parrot fix bugs or implement new features, they release new software that you can put onto your AR.Drone.
Unfortunately, Parrot don't have a great track record in describing what the changes are between each of the versions.
For details on how to change your current firmware, see here.
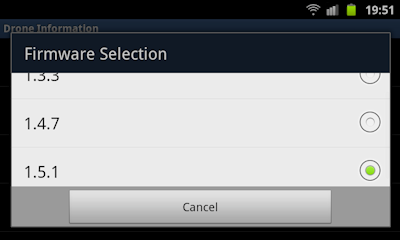 |
Changing the firmware in your AR.Drone is a risky business. If the process fails part-way through then you are in a bit of a mess as your AR.Drone will no longer work. Luckily, AR.Pro makes it easy to upgrade. By selecting the Current Firmware option you are presented with a "Firmware Selection" window that lists available firmwares. You can choose a different firmware and AR.Pro will start the upgrade process. AR.Pro also allows you to revert to an earlier firmware, in case you find you have too many problems with a later release. |
Before you carry out any upgrades, it is recommended that the following points be considered:
This option lists the inertial hardware version relating to specific components on the AR.Drone's motherboard.
This option lists the inertial software version related to the inertial hardware.
No surprises here. The Total Flight Time just records the cumulative amount of time recorded by your AR.Drone when it "thinks" it has been in the air. This is like the mileometer in your car. It could be a handy check before buying a used AR.Drone.
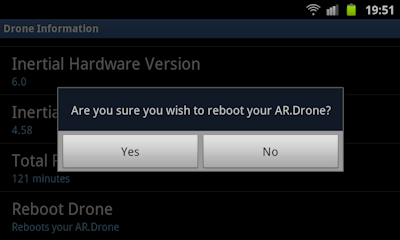 |
This will do a software reboot of your AR.Drone without having to disconnect and reconnect your battery. You may want to do this to reset the AR.Drone in case it gets itself in a tizz! You do receive a warning message just in case you pressed it by mistake. |
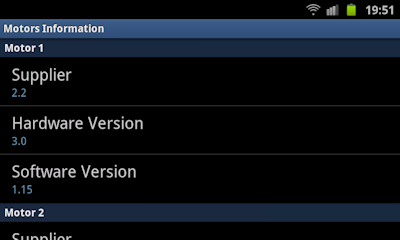 |
If your AR.Drone contains information, AR.Pro will display it! The Motors Information lists all the details that can be reported about each of the four motors installed in your AR.Drone. Values are reported for the:
Unless you have an unusual setup, motors one to four should report the same information. |
 |
The software in you AR.Drone supports various methods of detecting patterns and colours using its built in cameras. This means you can configure your AR.Drone to detect other AR.Drones and obstacles or targets, for use with "Augmented Reality" games. These settings are disabled by default but AR.Pro allows you to activate and configure them. |
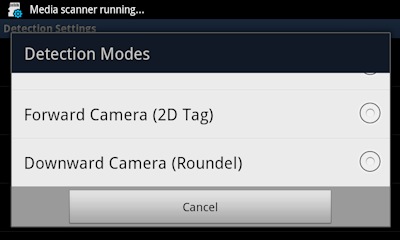 |
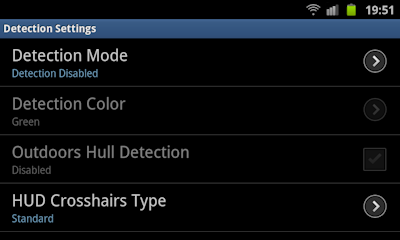
There are three basic modes for detection:
The Forward Camera option is designed for detecting colours on other AR.Drones whereas the Downward Camera is designed to detect targets on the floor. A great Roundel (i.e. a round target) for downward detection is available to download from the author of the AR.Pro's website. |
Once a detection mode is enabled, an extra option appears on the main menu screen to allows you to quickly toggle it on and off.
 |
When you purchase your AR.Drone, it comes with some stickers. These are included to attach to your outdoor hull and the colour of the stickers are referred to here. You can pick the colour that your AR.Drone should detect. This should be the colour of the stickers attached to your opponent's AR.Drone. Note that AR.Pro does not currently support any augmented reality games. This will hopefully be a future addition. |
Rather than use stickers to help your AR.Drone target another AR.Drone, you can choose to detect the colour of the hull of your opponent's AR.Drone. Enable this option and set the colour Detection Colour choice based on the colour of the hull you want to detect.
 |
The "Head Up Display" crosshair type refers to the style of the crosshair that will appear on screen when targetting anything that has been detected. You can an example of the targets |
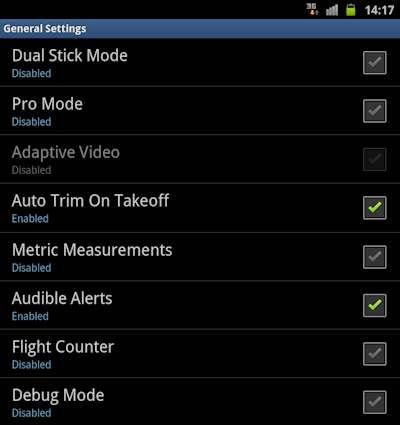 |
General Settings, as you might imagine, gives you access to everything else! Everything not covered elsewhere can be found here:
Details of each of these options are described later in this section. |
 |
This mode provides you with two joystick controls. One on the left and one on the right. With this option enabled, the tilt of your Android device does not apply. Instead, you use the right stick for yaw and altitude and the left stick for pitch and roll. Two hands (or at least two fingers) are required to control your AR.Drone in this mode. |
 |
Pro Mode is a "one-handed" control method that is probably not best suited to beginners. Keep it turned off until you have developed good control of your AR.Drone. When Pro Mode is activated, you are only shown the directional joystick. As usual, you use this for ascending/descending and yaw, but whenever you touch the joystick and keep your finger pressed against the screen, the tilt/angle of the Android device also comes into play. Hence you can control the pitch and roll, whilst at the same time managing yaw, ascent and descent, all with one hand! |
 |
Pro Mode is easy to spot as once it is engaged, the grey/red toggle button that usually activates the tilt/angle of your Android device is not present. In order to let the AR.Drone "settle" in Pro Mode, you just need to remove your fingers from the screen of your Android device and the AR.Drone will hover at its present altitude. Pro Mode allows you to control the AR.Drone is the most manoeuvrable way possible - but it does take some practice. |
The Adaptive Video mode affects the video stream displayed on screen.. The adaptive stream allows the quality of video to vary to maximise available bandwidth for communication with and control of the AR.Drone. This should be set to activated unless you suffer video stream issues.
The "Trim" of your AR.Drone frames its idea of what "level" is. You can choose to set the trims manually when you know the AR.Drone is completely flat, or you can enable this option to automatically tell the AR.Drone it is on a flat surface when it takes off. This works well providing you launch from a flat surface. If you launch from a surface that isn't flat, then auto trim option should not be set, otherwise your AR.Drone will not have good sense of what "level" is, and the controls on your Android device may have to compensate in flight.
This option displays the height (as shown in item "j" on the Control Mode Key) of your AR.Drone in meters instead of feet.
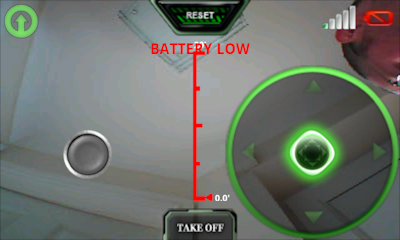
Enabling this option will make your Android device warn you with an audible tone when the battery in your AR.Drone is low, or when you are going out of Wi-Fi range.
Want to know how long you have been in the air each flight? Enable this option and as you can see, as shown in item "b" on the Control Mode Key, how long your AR.Drone has been tripping the light fantastic.
Love to debug? This mode records debug type information which can be reviewed for specific troubleshooting purposes.
 |
Your AR.Drone isn't going to be much use if you cannot connect it to your Android device. AR.Pro therefore has a range of options to help make it easy to connect to your AR.Drone:
If your Android device supports connecting to ad hoc networks (see here), then you will probably not need to tweak any of these settings. You can just use the "Connect to Drone" option on the main menu. However, the "Network Information" screen will also report the current settings, even once you are connected. Details of each of these options are described later in this section. |
If you have installed the "Infrastructure Patch" (see here), you can then enable the "Infrastructure Mode" option. This tells AR.Pro you want to work in "Infrastructure Mode" instead of the standard ad hoc mode.
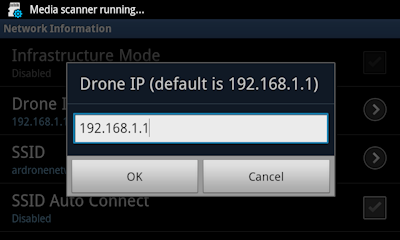 |
This option informs AR.Pro of the IP address of your AR.Drone. This is so AR.Pro knows where to look when it tries to connect to your AR.Drone. The IP address of a brand-new AR.Drone, i.e., its default IP address, is 192.168.1.1. If you have changed the IP address of your AR.Drone for any reason, then you will need to specify the IP address of your AR.Drone by selecting the "Drone IP Address" option. and entering the new address in the "Drone IP" window. Note: You are not telling your AR.Drone what address to have, you are informing AR.Pro what the address is. |
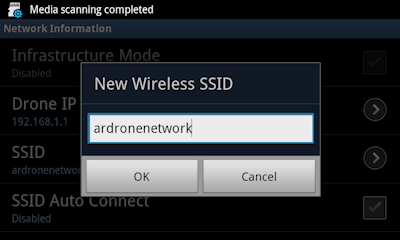 |
An SSID is essentially the name of a wireless network. When an AR.Drone is in its default Wi-Fi mode (ad hoc), it broadcasts its name such as "ardronenetwork" or "ardrone_124711". This is the name of the network your Android device will need to be connected to in order to communicate with the AR.Drone. The SSID option in AR.Drone allows you to change the SSID, but unless you are using infrastructure mode, it doesn't really take any effect. In infrastructure mode, it tells the AR.Drone which network to connect to when it powers up. |
The "SSID Auto Connect" option tries to force your Android device to automatically connect to a particular wireless network, as specified in the SSID option (see here). This can be handy because if your Android device is already connected to a wireless network which is not your AR.Drone, the "SSIS Auto Connection" option saves you the trouble of accessing your Android device's Wi-Fi settings to manually tell it which network to connect it. The auto connect functionality will take place when you press the "Connect to Drone" option found on the main menu.
Do not enable "SSID Auto Connect" if you are using the Wi-Fi hotspot built into your Android device to communicate with your AR.Drone (see here). That instructs the Wi-Fi on your phone to connect to the hotspot on your phone. Not gonna work!
Enabling the Paired setting links the AR.Drone to the wireless network on the device running AR.Pro. It also displays the MAC address of the device the AR.Drone is paired with. If the Paired status is 00:00:00:00:00:00, then the AR.Drone is not currently paired with anything.
When your AR.Drone is paired with a device, it cannot be used with another device until you remove the pairing. If you paired it using AR.Pro, uncheck the Paired option to remove the pairing. Alternatively, press the unpair button on the bottom of your AR.Drone. When you unpair your AR.Drone, the lights will flash red and green on each of the motors, to signify that the memory has just been wiped.
Note:
Menu » Preferences » Network Information » Infrastructure Patch
This option will offer to display details about the "Infrastructure Patch", which is something to changes how your AR.Drone talks to other wireless devices. Rather than being the host of an ad hoc wireless connection, the "Infrastructure Patch" allows your AR.Drone to connect to other Wi-Fi hosts, such as your Android device's Wi-Fi hotspot or even your Wi-Fi router. See here for more details.
Firstly, this item reports the current status of the "Infrastructure Patch" on your AR.Drone. By default, it should be disabled. If you install the "Infrastructure Patch", this item will change to report "Installed".
Installing the "Infrastructure Patch" allows your AR.Drone to automatically connect to an Infrastructure network. The full steps to follow are outlined here.
 |
AR.Pro allows you to customise key settings to help your AR.Drone match its environment and your personal preferences for responsiveness. The following options are currently available:
It is recommended that any changes made to these settings are carefully tested in a safe environment before letting your AR.Drone loose! Details of each of these options are described later in this section. |
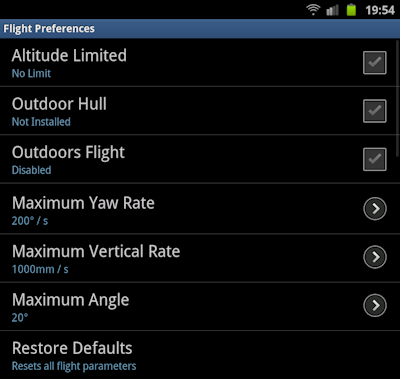
This setting enables your AR.Drone to self regulate it's maximum height. If the setting is enabled, the AR.Drone will be restricted from ascending higher than 10 feet (subject to the reliability of its ultrasonic sensors). If you turn the limiter off, then your AR.Drone can climb as high as your Wi-Fi range will allow. WARNING: the wind you feel at ground level is not necessarily the same higher up. The wind can often be stronger an less predictable higher up. Be careful!
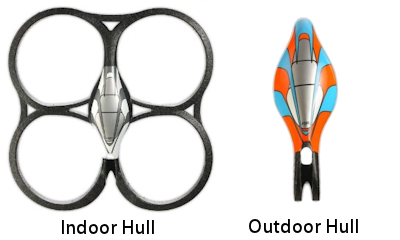 |
This setting lets AR.Pro know whether or not you have the outdoor hull installed. The outdoor hull is the coloured hull - as opposed to the grey, indoor, polystyrene hull. This setting subtly changes the performance of the AR.Drone in anticipation of the differences in weight. It is a good idea to always correctly indicate the type of hull in use for maximum stability and control. Of course, the outdoor hull can also be used indoors. |
This setting lets AR.Pro know whether or not you are operating your AR.Drone inside or outside. It can be set independently of the Outdoor Hull setting - as the indoor hull can of course still be used outside...
Outdoor flight mode tunes the AR.Drone for operating in wider outside spaces, ready to react to more air turbulence than it might expect indoors.
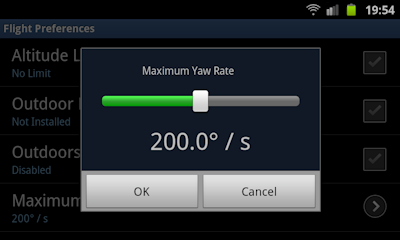 |
The "Maximum Yaw Rate" setting determines how quickly your AR.Drone turns. It is measured in degrees per second. The greater the number of degrees, the faster your AR.Drone will turn and so the faster you will have to react! |
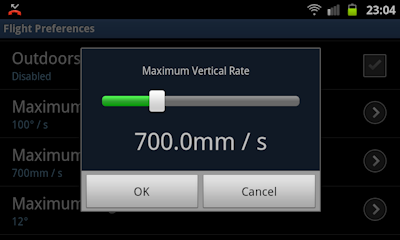 |
The "Maximum Vertical Rate" setting determines how quickly your AR.Drone can ascend and descend. It is measured in millimeters per second. The higher the setting, the quicker the response. |
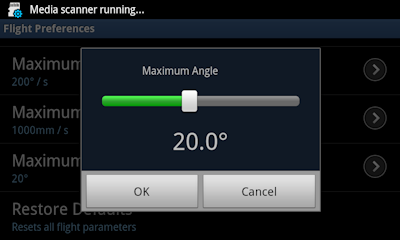 |
The "Maximum Angle" setting determines how far your AR.Drone will tilt in any direction. The greater the angle, the more it is going to tilt - hence the faster it can travel in any particular direction. The setting suppresses the "ANGLES ERROR" that would ordinarily trigger an emergency shutdown. WARNING: the greater the angle, the greater the risk of flipping your AR.Drone and the faster it will travel. |
Use the Restore Defaults option to return your Flight Preferences to the AR.Pro defaults. Very handy if you have had a tinker but cannot remember what the original settings were.
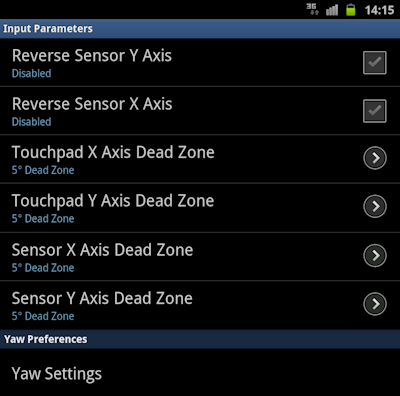 |
The "Input Parameters" section allow you to configure the gyroscopic interaction between your Android device and your AR.Drone, i.e., it controls how tilting your Android device affects your AR.Drone. These settings do not take effect if you are using the Dual Stick Mode method (see here). The customisable options are as follows:
|
The Y Axis controls are flipped. Normally, with your Android device held in a landscape orientation, tilting the top side of your device forward would cause your AR.Drone to roll forward (and of course fly forward). Therefore, with the Y axis reversed, tilting the top of your Android device forward causes your AR.Drone to roll backwards (and fly backwards).
The X Axis controls are flipped. Normally, with your Android device held in a landscape orientation, tilting the left side of your device down and the right side up, would cause your AR.Drone to roll to the left (and of course fly sidewards to the left). Therefore, with the X axis reversed, tilting the left side of your device down and the right side up, your AR.Drone will roll to the right (and fly sidewards to the right).
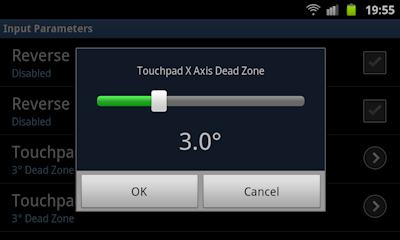 |
The dead zone is measured in degrees and affects how sensitive your AR.Drone is to movements of the on-screen joystick along the X axis. If this setting is set to 0 degrees, the smallest movement of the joystick along the X axis will move your AR.Drone. If you increase the number of degrees, then the further you would need to move your finger on the joystick in order to affect your AR.Drone. |
 |
The dead zone is measured in degrees and affects how sensitive your AR.Drone is to movements of the on-screen joystick along the Y axis (pitch). If this setting is set to 0 degrees, the smallest movement of the joystick along the Y axis will move your AR.Drone. If you increase the number of degrees, then the further you would need to move your finger on the joystick in order to affect your AR.Drone. |
 |
The dead zone is measured in degrees and affects how sensitive your AR.Drone is to movements of your Android device along the X axis (roll). If this setting is set to 0 degrees, the smallest movement of your Android device will move your AR.Drone. If you increase the number of degrees, then the further you would need to tilt your Android device in order to affect your AR.Drone. |
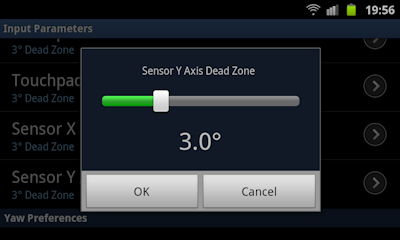 |
The dead zone is measured in degrees and affects how sensitive your AR.Drone is to movements of your Android device along the Y axis (pitch). If this setting is set to 0 degrees, the smallest movement of your Android device will move your AR.Drone. If you increase the number of degrees, then the further you would need to tilt your Android device in order to affect your AR.Drone. |
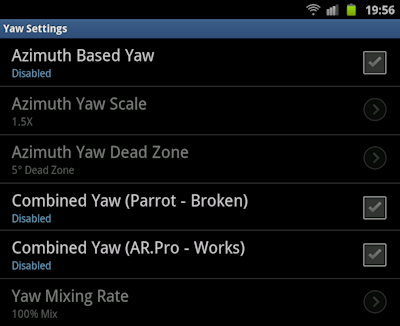 |
"Yaw Settings" allows you to enable various yaw control modes for controlling your AR.Drone. The following options can be customised/enabled:
Details of each of these options are described later in this section. |
If your Android device has an electronic/digital compass, then you can use it to control the yaw of your AD.Drone. This means that if your Android device is laying flat in your hands and you rotate it left, your AR.Drone will turn/yaw left. Rotate it right and your AR.Drone will yaw right. This is extremely cool!
To set this up, make sure you calibrate your Android device's compass first - otherwise you will experience strange results. You can calibrate your compass with your built-in compass app, if you have one, or a free app such as GPS Status & Toolbox. Once suitably calibrated, enable "Azimuth Based Yaw" and try it out.
Menu » Preferences » Input Parameters » Yaw Settings » Azimuth Yaw Scale
 |
The "Azimuth Yaw Scale" allows you to adjust the relationship between the rate your Android device is rotated and the rotation of your AR.Drone. The higher the scale setting, the faster AR.Drone will rotate in relation to your Android device. |
 |
The dead zone is measured in degrees and affects how sensitive your AR.Drone is to movements of your Android device along the Z axis (yaw). If this setting is set to 0 degrees, the smallest movement of your Android device will move your AR.Drone. If you increase the number of degrees, then the further you would need to rotate your Android device in order to affect your AR.Drone. |
This method of combined yaw does not currently work in AR.Pro. See the working AR.Pro implementation.
This method of combined yaw is an implementation specific to AR.Pro and works.
Once enabled, the main screen will feature a new icon in the top left to indicate whether combined yaw is enabled:
 |
|
Yaw mixing is disabled. Tap the icon to toggle it on and off. |
Yaw mixing enabled. Tap the icon to toggle it off and on. |
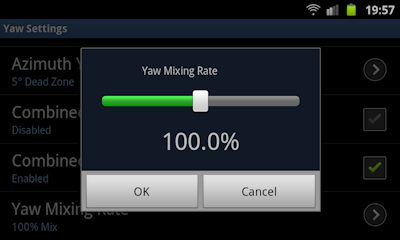 |
If you enable a "Combined Yaw" option (see here and here), then you can choose to mix it with the directional stick, and control the mixing rate with this setting. |
This does exactly as you would expect it to - it exits the AR.Drone application and closes it down. If you press the Home button on your Android device, the application may not necessarily close down and may remain running and connected to your AR.Drone.
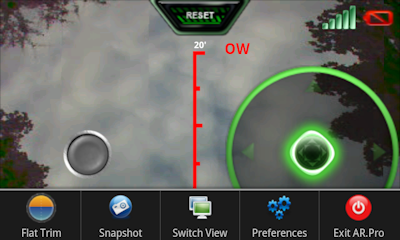
This command resets the AR.Drone's idea of what "level" is. You should set a flat trim when your AR.Drone is on a flat surface, such as the take-off platform (i.e. the box) that your AR.Drone came in. You can manually set this at any time once connected to your AR.Drone, or you can use the Auto Trim option (see here) that will automatically set a flat trim every time your AR.Drone takes off.
The Snapshot option simply catches the current the screen and saves it as an image on your Android device. The location of the saved image is briefly displayed on screen and should also appear in the Gallery app.
The "Switch View" option changes the view on the screen from the front-facing camera to the ground-facing camera, and cycles through a range of other viewing modes until it returns back to the front-facing camera.
Okay, so your AR.Drone is successfully connected to your Android device. Your preferences are all expertly set. You are in a safe and suitable location - in other words, you are ready to fly!
There are three basic control modes in AR.Pro which allow you to control your AR.Drone in slightly different ways. Whichever mode you use, the Azimuth yaw mode (see here) will only be present if activated in the settings.
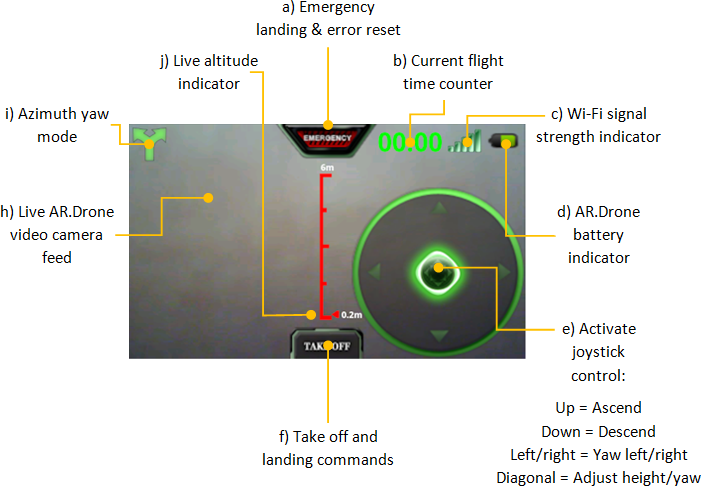
Non-Pro mode is the default mode and is distinctive because of the grey button shown on the left side of your screen, as shown on point "g" on the following image.
If you release the button, your AR.Drone will steady itself and maintain position:

Pro Mode is distinctive because it does not have the gyroscope activation button (see item "g" on the diagram for Non Pro Mode). Instead, the gyroscope controls are automatically activated whenever you touch the directional joystick (item "e" on the following image). This potentially makes controlling your AR.Drone more challenging but hey, you can operate it with just one hand!
To steady the AR.Drone, release your finger from the joystick and your AR.Drone will hold its position.
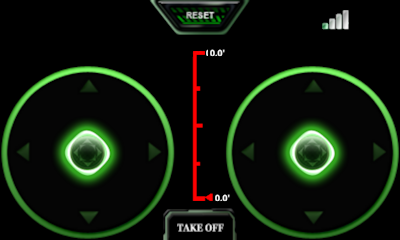
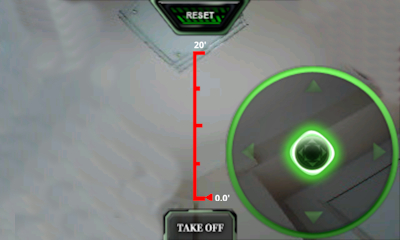
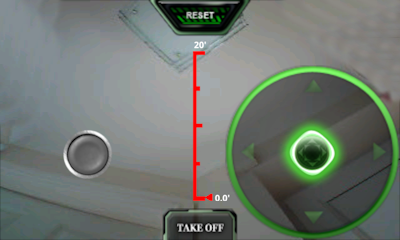
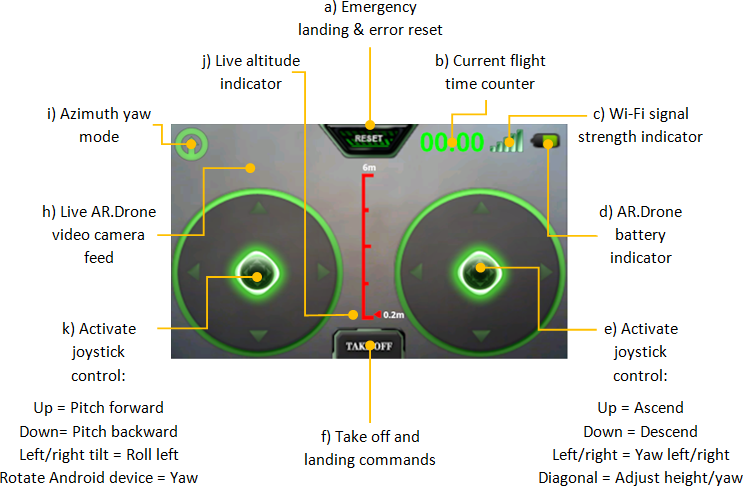
This mode does not use the gyroscope in your Android device and instead offers a second joystick control. The second stick controls the pitch and roll of your AR.Drone instead of controlling these actions by tilting your Android device:
a) |
Emergency landing & error reset - press this to immediately kill power to the motors. Your AR.Drone will fall! Following any kind of emergency, before you can fly again, you have to press this button again to reset the error. |
f) |
The Take off button will launch your AR.Drone, assuming it is level and no errors are displaying. When your AR.Drone is in the air, press the button again to safely land it. |
b) |
The flight counter is an optional display item. See here for description. |
g) |
Press and keep the grey button pressed (it turns red when pressed), to activate control of your AR.Drone based on the gyroscope in your Android device. |
c) |
Wi-Fi signal indicator. The stronger the better. |
h) |
The background of the display should be the view from the currently selected camera. See here for details on changing the view. |
d) |
AR.Drone battery indicator. Your AR.Drone will automatically land if it runs too low and will not start if there is not enough power. |
i) |
If you have an Azimuth yaw mode enabled, you can toggle between the available modes. |
e) |
The touchpad joystick control controls your AR.Drone's height and yaw. |
j) |
The altitude display provides a live reading from your AR.Drone's ultrasonic sensors, showing the height perceived by your AR.Drone. |
|
k) |
The second joystick replaces use of the gyroscope in your Android device. Use it to control the pitch and roll of your AR.Drone. |
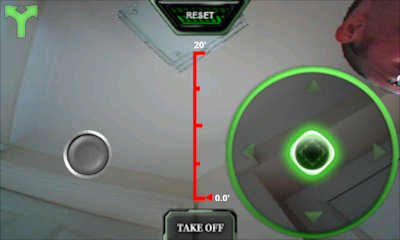
Tap the "TAKE OFF" button (see item "f" on the Control Mode Key) to fire up your AR.Drone and do not press anything else. Your AR.Drone will perform a very brief rotor test and then quickly ascend to approximately 1 meter into the air. Your AR.Drone should be reasonably stable and self-regulate itself, just hovering like the cool device that it is!
If anything goes wrong, press the "EMERGENCY" button (see item "a" on the Control Mode Key) to stop your AR.Drone dead in its tracks. BEWARE: the emergency button will make your AR.Drone fall like a brick (a very expensive one at that)! Following any kind of error, you will need to press the "RESET" (see item "a" on the Control Mode Key) button before you can fly again.
The next step to is press the "TAKE OFF" button (see item "f" on the Control Mode Key) again, which you will notice has now turned into a "LAND" button. Tapping "LAND" will cause your AR.Drone to carefully land itself nice and gently. And relax!
Press the "TAKE OFF" (see item "f" on the Control Mode Key) button again and practice the basic controls. This is it - you are now controlling your AR.Drone with your Android device. Enjoy! :-)
Some useful tips for the use of AR.Pro: